A sketch of the bar and weights.
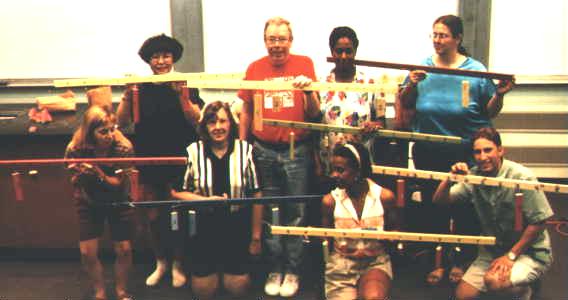
A class set of the Jensen Bars
Earl Zwicker - Illinois Institute of Technology The Jensen Bar - What is it and How to Make One (See Sketch and Photo Below)
Earl Zwicker Illinois Institute of Technology
BCPS Department
CHICAGO IL 60616
(312) 567-3384
Objectives:
1. To make a Jensen Bar
2. To learn where to get the materials
3. To learn how to put them together to make a Jensen Bar
4. To learn how to "fine tune" the Jensen bar
Materials Needed:
1. A "one-by-two" inch wood board
.. at least 4 feet long
.. pretty much free of knots
.. pine is easy to work with
Buy at a local lumber yard (Home Depot, Menards, Builder's Square, etc)
Often found in a 10 ft length, so two 4 foot Jensen Bars may be made
from it. You may also make "weights" from this board.
2. Cup hooks and eye hooks
Packages of 1/2 inch brass cup hooks may be found at the local hardware
(True Value, Ace, etc). You will need 20. You also will need 10 screw
eyes (size 214 1/2 is ok), available at the same stores.
3. Metal rod
At the local hardware store, buy a smooth metal rod. A 1/4 inch diameter
curtain rod will do. Length is not critical, but should be about 12 to
20 inches long.
3. Tools & Supplies
hand saw
ruler (British units or metric, your preference. A meter stick usually
has both.)
drill & 3/8 inch bit
sandpaper
pencil
scratch awl or push pin
carpenter's square
These items may be found in your school shop, if you have one.
(It pays to be on good terms with your shop teacher!) Seek
help if you feel the need, from a colleague, another school,
university or industry if you feel the need.)
Strategy:
In General -
The ruler, pencil and square should be used to locate the various points on
the bar where you will make holes for installing hooks, etc.
Look at the drawings and picture of the Jensen Bar shown below.
This will give you an idea of how your finished bar should look.
The instructions that follow are probably more detailed than you need if you
have experience at making things.
1. Making the bar
With the aid of the ruler, pencil, saw and square, cut the one-by-two to a
length of exactly 1.10 meters (or 40 inches if you prefer British). Sand
rough ends and corners smooth. You now have a "bar" of wood.
Either of the 1.10 meter by 2 inch faces of the bar will be called the "2
inch face." One of the 1.10 meter by 1 inch faces will be called the "bottom
edge" of the bar. The other will be called the "top edge."
2. Making the center hole
Push the point of the push pin (or scratch awl) into the bar at the exact
center of its 2 inch face, and remove, leaving a small hole. Use the small
hole as a guide and drill a hole through the bar (about 3/8 inch diameter)
perpendicular to the 2 inch face. A drill press can help ensure
perpendicularity. Sand hole edges smooth.
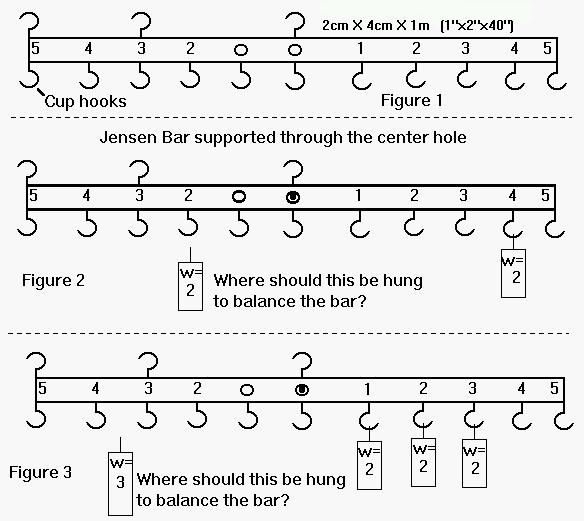
3. Making a "20 cm" hole
Arbitrarily identify one of the 2 inch faces as the "front" of the bar.
Following a procedure similar to #2 above, drill a 3/8 inch hole with its
center located exactly 20 cm (or 8.0 inches if using British) to the right of
the center hole.
4. The cup hooks
The idea is to end up with a set of cup hooks along the bottom edge of the
bar, spaced exactly 10 cm apart. (Use 4.0 inch spacing for British.) You
will also want a cup hook on the top edge of the bar, centered exactly above
the 3/8 inch center hole.
At the exact center of the bottom edge, make a small hole (push pin). It
should be directly below and perpendicular to the 3/8 inch center hole. This
is where you later will screw in the center cup hook. Do the same at the
exact center of the top edge to put (later) a cup hook there.
On the bottom edge, make 8 more small holes, 4 on each side of the small hole
you just made at the center, and space them exactly 10 cm apart (4.0 inch for
British).
Carefully screw the cup hooks into the small holes on bottom edge,
perpendicular to the edge. If you can, use your fingers to do this, since
this will probably give you the best control.
You should now have 9 cup hooks installed on the bottom edge: 1 at the center
and 4 on each side. Install a cup hook at the top center also.
You now have a Jensen Bar!
5. Weights
It is useful to have a set of identical weights that can be hung from the cup
hooks, and attached to each other from below, in tandem. A set of such
weights can be made from the same "one-by-two" board.
Cut 10 pieces from the board, each 8.0 cm (3.0 inch British) long. Lightly
sand corners and edges. Hold one of the pieces with its 8.0 cm dimension
vertical. Use the push pin to make a hole at the center of its top end. Do
the same for the bottom end. Then put a screw eye into its top end, and cup
hook into its bottom end. Repeat for the other 9 pieces.
These are the weights.
6. Fine tuning
Suspend the Jensen Bar from the cup hook at its top center. (This may be
done any convenient way: use a 1/8 inch diameter rod clamped to hang over
the edge of a table; clamp a board to a table top so that it protrudes out
over the edge of the table and mount a screw eye on that end; use a ring
stand with a 1/8 inch rod clamped horizontally, etc.)
The bar should hang so that it balances horizontally. This usually doesn't
happen because of uneven density of the wood and/or because of the weight
of wood removed by drilling the 20 cm hole.
In order to make it balance horizontally, weight must be added to the end
of the bar that moves up. Find some small nails and lay one at a time at
that end, until the bar is balanced horizontally. Then drive the nails into
the end of the bar, taking care not to damage the cup hooks.
It should balance nicely in a horizontal position, and your Jensen Bar is now
"fine tuned."
It is also useful to use a broad-tipped marker pen to place numbers on the
front face of the bar. Place a "0" at the center. To the right of center,
place a "1" at the 10 cm cup holder position, a "2" at the 20 cm position,
etc. Similarly, use a different color marker to number successive 10 cm cup
holder positions to the left of "0."
Assessment:
This assessment has two objectives:
a) To test the Jensen Bar to see that it works well enough
for classroom use.
b) To provide the beginnings of insight into how it may be used,
for teachers who do not usually teach the physical science ideas
associated with the Jensen Bar. You will assess your own
understanding, and so will learn what questions to ask to get help.
With the Jensen Bar suspended horizontally, hook a weight to the cup holder
at position 2. What happens? Is this what you expected?
At what position must you hang a second weight in order to bring the bar
back to horizontal?
If two weights are hung (in tandem) at position 2, what happens?
Is there a position that a single weight now may be hung to bring
the bar back to horizontal? What do you think it is? Does it work?
Can you formulate some simple rules that will correctly predict where and
how much weight must be used to bring the bar back to horizontal from an
unbalanced position?
What happens if the Jensen Bar is suspended by placing it on a horizontal
rod through its center hole? Move the bar to a non-horizontal position and
release it. What happens? Try other non-horizontal positions. What
happens? Can you explain this?
Conclusions:
We state without proof at this point, that the Jensen Bar may be used from
kindergarten through PhD to pose challenging problems in mechanical
equilibrium to the learner.
This may be the basis for future "lessons" using the Jensen Bar, to appear on
this website.
References:
Find a physical science book and look up "levers."
Find a physics teacher who is willing to explain.